Task Roadmap
To create a Viber campaign, follow these steps:
Please note that your Viber Sender ID must be enabled to create and send a Viber campaign. For more information, get in touch with ace@apifon.com.
- From the Dashboard menu, go to Campaigns > Messaging.
- Click the Add button.
- Select Viber Messaging.
- At the bottom of the page, enter the name of your campaign.
- Click Create.
Campaign Design
To set up your campaign, follow these steps:
1. Lists
i. Select one of the available lists or quickly upload your subscriber list.
ii. Choose Next.

2. Segments
You can select the entire list by selecting all subscribers or a segment of your list.
3. Message
Design your Viber message and fill in the necessary information.- Select your Sender ID.
- Click on Templates if you have a saved template.
If you don’t have a template, choose one of the available message layouts.
- Design the body of your message (text).
- Type your message in the Message content field. You can use letters, symbols, and emojis, but please note that there is a 1,000-character limit.
- If you want to add special personalized subscriber fields in your message, select the Fields icon, choose the field you want, and it will be inserted at the location of the cursor inside the text.
- Import your Image (file), provided you have chosen a related layout.

Note: You can include an image only in .jpg format, with recommended dimensions of 400 x 400 pixels.
-
- Edit your Button (provided you have chosen a related layout).
Fill in the Button Text (the text that will appear on the button) with a maximum of 30 characters, and enter the Button URL (the link users will be redirected to when they click on the button).
If needed, you can enable “Disable URL Shortening” through URL Options.
When enabled, the URL is delivered exactly as entered and will not be shortened. This option is recommended for app links, deep links, or URLs that may not function correctly when shortened (e.g., WhatsApp, Telegram, or App Store deep links).
Please note that when this option is enabled, the button URL cannot be tracked through the platform, as URL shortening is not applied.
As a result, any tracking, analytics, or click measurement should be implemented externally.

- Edit your Video (URL), provided you have chosen a related layout.
Fill in the required information in the Video file field:
- Edit your Button (provided you have chosen a related layout).

![]() Thumbnail URL: The link of the still image that will appear in the Viber message. The limit is 1,000 characters, and the format should be .jpeg or .png.
Thumbnail URL: The link of the still image that will appear in the Viber message. The limit is 1,000 characters, and the format should be .jpeg or .png.
YouTube videos are not supported by the Viber app.
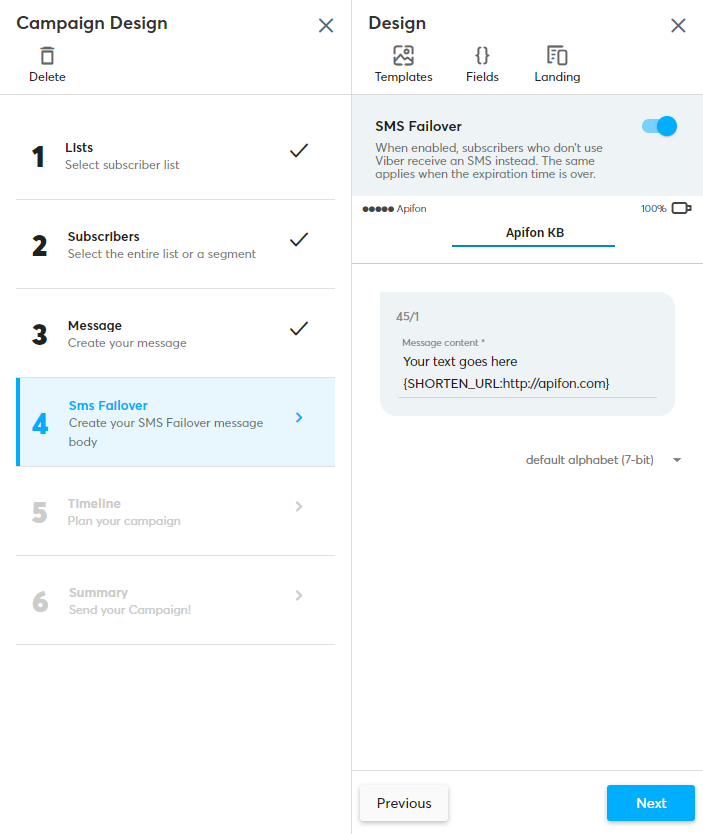
4. SMS Failover
You can enable SMS Failover, so if a subscriber does not use Viber, the message will be automatically sent via SMS.
If you want to skip the SMS failover, deselect the option at the top of the screen.
- Write your SMS message, keeping in mind that there is a character limit of 160 characters.
To add special subscriber fields to your SMS text, select the Fields icon. - Click Next.
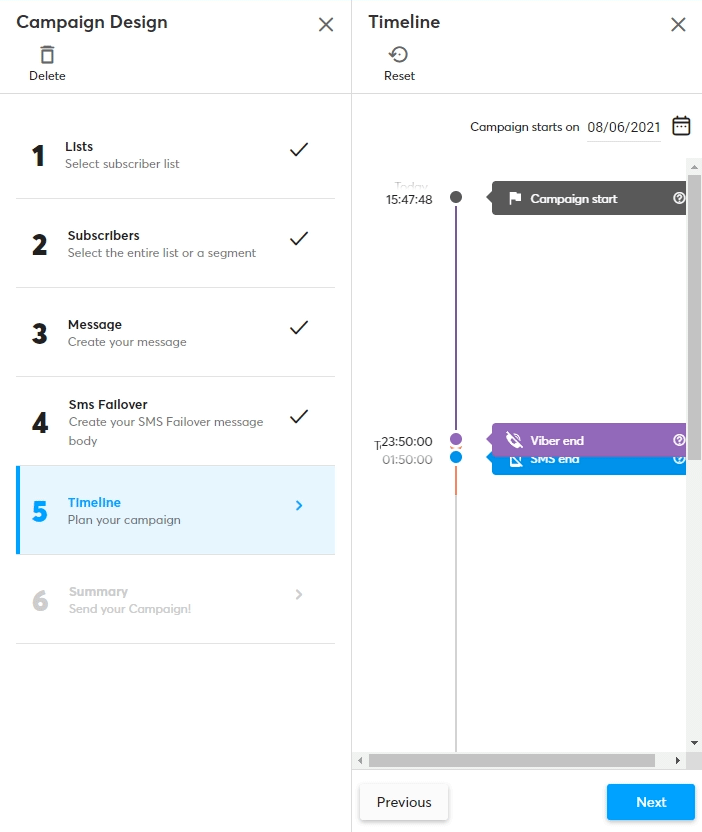
5. Timeline
To schedule your campaign, follow these steps:
If you wish to send your campaign instantly, ignore it and go to Next.
- Select the desired sending date. Choose when you wish your campaign to start from the calendar icon.
- Set the start and end times by dragging the cursor accordingly.
- If you have enabled SMS Failover, select the end time for the SMS sending.
- Click Next.
6. Summary
Check the overview of your campaign, including the campaign’s name, sending date & time, number of subscribers, number of estimated messages, and selected list.
The mobile phone screen shows you a preview of your message as it will appear on the recipient’s device.
Test your handset
Before sending your campaign, send a test message to your mobile or a group of mobiles:
- Go to Test or Test to your handset.
- After selecting the country code, enter the mobile number(s) for the test.
- Finally, click Send.
-gif.gif?width=670&height=400&name=Knowledge%20Base%20images%20%26%20videos%20(4)-gif.gif)
By clicking the Start Campaign button, your campaign will be sent.

If you do not want the completed campaigns to be displayed, you can archive them after selecting the campaign and choosing Archive in the Campaign Overview.
This way, all Archived Campaigns will no longer appear on the homepage unless you choose to search by Campaign Status.
Now you know how to create and send Viber campaigns on the Apifon platform.
Thank you for reading!