- Apifon provides services directly through the Apifon platform or via API integration so that you can connect your application and optimize communication with your customers.
- You can use Apifon's API to send automated Viber/SMS messages and to synchronize your list from another system to your Apifon list.
- Apifon provides API integration in both production and staging environments.
Basic Integration Steps
If you wish to connect your application using Apifon's API, you should follow the steps below:
- Create an account on the Apifon platform.
- Create API Tokens.
- Study our public API Documentation with detailed instructions on how to send and manage your requests.
- Implement the integration.
API Tokens
Follow the steps Account Name > Developers to create an API Token or edit an already existing one.

Types of Authentication
![]() HMAC Token
HMAC Token
- HMAC is a specific type of message authentication involving a cryptographic hash function and a secret cryptographic key. It may be used to verify simultaneously both the data integrity and the authenticity of a message.
![]() OAuth Token
OAuth Token
OAuth is a widely used security standard that enables secure access to protected resources.
Create an API Token
To create a new API Token, follow the steps below:
- Click your Account Name and then Developers.
- Click the
 Add button.
 - Select the authentication type for your new Token (HMAC/OAuth).
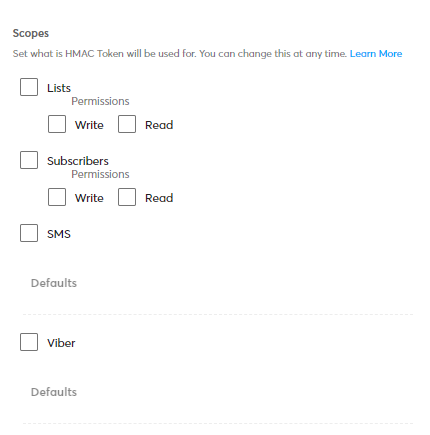
- Enable the Scopes you want to be accessible through this Token.
- Lists: Enable if you want to implement list synchronization and choose to give Write and/or Read permissions.
- Subscribers: Enable to get access to subscriber information and choose to give Write and/or Read permissions.
- SMS: Enable to get access to send SMS messages and set the SMS Default Sender ID you are going to use to send SMS messages.
- Viber: Enable to get access to send Viber messages and set the Viber Default Sender ID you are going to use to send Viber messages.
5. Type a Description for this Token (Optional).
6. Fill in the IPs you are going to use to send requests.

7. Click Create.

Permissions
- Read permission allows access to information.
- Write permission allows access to edit. If a token has written permission, it also has read permission by default.
Defaults
- The SMS Sender ID is the SMS sender name and should be up to 11 Latin alphanumeric characters. You can use different SIDs per request.
- The Viber Sender ID is fixed and needs to be registered in the Viber app.
For more information, feel free to contact our sales team at sales@apifon.com.
Allowed IPs
-
If you have a static IP, you may restrict the IPs that will be allowed to send requests on your behalf. To do so, erase the asterisk (*) and insert your IPv4.
Edit & Copy API Tokens
After you create your API Tokens, you can revisit them anytime from Account Name > Developers to view, edit, or delete them.
Copy an API Token/Key
-
To copy an API Token/Client ID, click on the copy icon
 next to the ID.
 -
To copy an API Key, click Reveal
 , and then click on the copy icon next to the key.
Change an API Key
- Select the Token.
- Scroll down to Additional Options.
- Click Generate New.
- Confirm Generate New Key.

- Click Save.
- If you generate a new API Key, it will take some time for the changes to apply.
- Do not share your API Keys if not necessary. They are confidential, just like your passwords.
- Values provided inside API requests will override the default values provided in the platform.
Now you know how to manage your API tokens on the Apifon platform. 🚀
Thank you for reading!