The primary focus is on enabling automated email communication based on specific date triggers. Your business will benefit from improved automation workflows, including the ability to view and edit date-based automations.
Date-based automations will be triggered by a date that is stored as a property within a list. When collecting date properties from your customers, the date needs to be in one of Apifon's accepted date/time formats and consistently align with the correct method for creating a date list field.
The date-based automations will include 3 types of triggers.
-
Recurring Date. Surprise your contacts with personalized birthday greetings, and set reminders for regular events, subscription renewals, or important milestones, ensuring you never miss a beat.
- Specific Date. Craft tailored messages for an upcoming event, follow up on appointments, notify subscribers with limited time offers, or mark significant moments in your audience's journey.
- List Added Date. Follow up with contacts who have recently joined your list. Additionally, you can send them anniversary offers as a token of appreciation or a review of their year.
- Subscribers will receive date-based automation emails only once, unless triggered on a recurring day.
- If no date fields are detected in your list, some types of trigger will not be available.
Common examples of date-based automation triggers include:
-
Birthday
-
Anniversary
-
Appointment
-
Subscription date
-
Wedding date
-
Pregnancy due date
Create a date-based automation
Navigate to the Automations tab, and follow the steps below:
- Click on Automations, and then
 Add.
Add. - Type your automation name. This name will only be accessible within your Apifon account and will not be visible to your subscribers.
- Click Create.

- Design your automation. To start designing your automation, select your list or a segment of your list.
- Choose a trigger type for your date-based automation: Recurring date(Yearly), Recurring date (Monthly), Specific date, or Subscriber created date. If you choose the Recurring day automation, you will have to select when this flow should repeat, either monthly or yearly.

- Choose what will trigger this automation, a Date or Subscriber created date.

Then pick when the flow will start. You can choose to start the flow on the same day (by default, this option will be preselected, allowing for immediate correspondence if needed) or on a custom day (before or after the actual date). If you choose to start the flow before or after the date, you can select any number of days or months in advance. For instance, if it is a birthday flow, you can start sending messages to the recipient one week (7 days) before their actual birthday. Finally, set a time of day to send the message.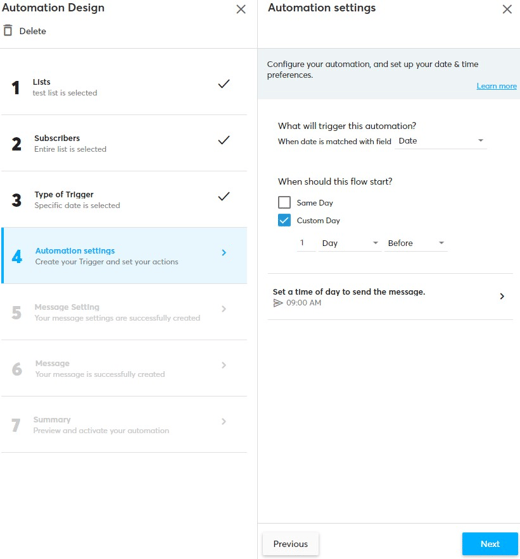
Options for Sending: There is the option to define the number of days for delay or early sending, up to a maximum of 180 days or 6 months before or after the specified date. When the month option is selected, and the specified date falls on the last day of the month, emails will be scheduled for the final day of the respective month, such as the 31st.
Delay: The period between a trigger event and an email send.
7. Set up your automation message settings and create the message content with the drag-and-drop builder.
8. Preview and Summary. Now you are ready to activate your automation.
How to choose a type of trigger
1. List Added Date
In the list added date type, an automation is triggered based on the date a subscriber joined the list. Since the automation does not repeat, each subscriber will be eligible to receive a message only once, when the day and month of their signup match.
This type will not include options for recurring emails at a standard frequency.
2. Specific Date
In the specific date type, an automation is triggered based on the selected date field. Since the automation does not repeat, each subscriber will be eligible to receive a message only once, when the full date (day, month, and year) matches.
This type will not include options for recurring emails at a standard frequency.
3. Recurring Date (Yearly)
In the recurring date type, the automation will repeat on the selected date field (including the List Added Date), at a monthly or yearly frequency.
Yearly: Subscribers will be eligible to receive a message on a yearly recurring basis on the same month and day.
Examples: a yearly anniversary or birthday series, remind users to renew a subscription, thank loyal followers, e.g., 1,2, or 3 years of loyalty to the brand.
4. Recurring Date (Monthly)
Monthly: Subscribers will qualify to receive a message on a monthly recurring basis, on the same day each month.
If the day of the month is the 31st, the automation will automatically run on the last day of any month that has fewer than, for any month that has fewer than 31 days (i.e., 28/2 or 30/4).
Example: a monthly subscription reminder series.
Now you know how to create and use date-based automations on the Apifon platform. 🚀
Thank you for reading!