
In this article, you will learn how to set up a Shopify integration on the Apifon platform in order to bring your customer profile and order data into Apifon.
Before you begin
In the Integration section, you will find a list of available Ecommerce integrations and a hub where you can view, configure, and manage all integrations. The second available option supports integration with Shopify, allowing you to enable Apifon's Shopify integration. Adding the Shopify integration and configuring specific settings will automatically bring all your user and order data into Apifon, opening up further capabilities such as segmentation, campaigns, automations, etc.
Through this process, you will be able to view the status of the integration, view the configuration of the active integration, or remove it if needed.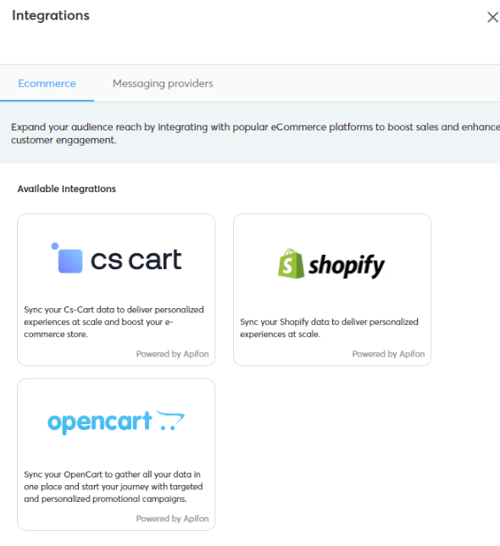
Set Up a Shopify Integration
To set up a Shopify integration, follow the steps below:
- Click on Integrations in the left menu.

- Click on the Shopify.
- Click Set Up Integration.

- Type a List Name. Provide a name for the list that will be created in Mookee and will include the Shopify audience. Mookee automatically suggests a default, editable list name.
- Fill out the Shopify Settings:
Shopify URL (including URL validations): Provide the FQDN (fully qualified domain name in the format http(s): //{FQDN}) of the Shopify instance that will be integrated with Mookee.
Shopify API access token: Provide a valid API key. The API key can be generated in the profile of the Shopify admin user.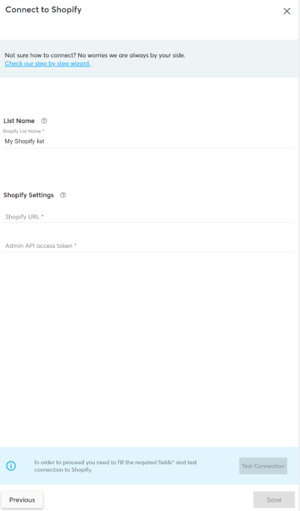
- Click Test Connection so the platform can verify the configuration settings before proceeding to the next step.
If the test connection fails, it indicates an error in the configuration settings you entered. Please check the settings and retry.
If the test connection is successful, you can complete the configuration.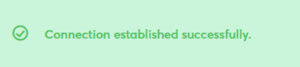
- Click Save.
- Click Start Synchronization.
A bar will appear to show the progress of the synchronization and your Integration will be in status Syncing.-2.png?width=550&height=236&name=image%20(1)-2.png)
When the synchronization is complete, the status will change to Enabled..png?width=550&height=223&name=image%20(2).png)
Edit a Shopify Integration
The configuration details of a Shopify integration that has been already established can be altered up to a certain point, through the Settings option.
You cannot update the list name and the Shopify FQDN. In this case, the integration should be removed, and a new one should be created..png?width=550&height=366&name=Untitled-1-01%208%20(1).png)
- You can only update the API access token.
-
If you choose to remove the integration, all of its settings will be permanently deleted.
- You cannot edit the integration settings while the integration is in status Syncing.
-
If any of the configuration details are altered, a test connection is required again before proceeding with the update of the integration settings.
List Creation
When a Shopify Integration is enabled, a new list will be automatically created, and the synchronization process will begin to import data.
All new subscribers will be subscribed to receive email and mobile communications as long as they have provided their email and/or mobile in the e-commerce.
Historical data synchronization
After completing the integration, historical data on orders made in Shopify are retrieved, in addition to the synchronized Shopify audience data.
More specifically, for every order, the following information is retrieved:
- Order ID (identifier of the order in Shopify)
- Order date/time (date time an order was created)
- Order status (status of the order in Shopify)
- Order total (total amount of the purchased items)
- Customer ID (identifier of the customer that placed the order in Shopify)
- Customer email (email of the customer that placed the order in Shopify)
Synchronizing historical order data is crucial for enhancing segmentation and enabling the creation of insightful prebuilt e-commerce segments.
Synchronizing historical order data is crucial for generating the e-commerce metrics displayed in the list overview.
Periodical data resynchronization
The integration process for Shopify data synchronization provides you with more timely information. You can resynchronize the list with the updated Shopify data on demand to ensure the latest information is available in mookee.
- An automatic periodical resynchronization will occur every hour, ensuring that all the latest e-commerce data are retrieved.
-
The Re-Sync option is unavailable while the integration status is either Syncing or Disabled (the feature is currently unavailable).
Remove Shopify Integration
How to remove Shopify integration?
- Click on Integrations on the menu on the left.
- Click on the three buttons > Remove integration.
.png?width=302&height=162&name=image%20(3).png) Removing an integration will disable its functionality, and as a result, the update of the integrated list and segments will cease.
Removing an integration will disable its functionality, and as a result, the update of the integrated list and segments will cease.
- Once an integration is removed, its settings will be permanently deleted and cannot be recovered.
- Upon the removal, an email notification is automatically triggered and sent to the end user.